RAPPAN ATHUK - LEVEL 6 MAZES
Designed by Justin Alexander
This material is covered by the Open Gaming License.
On Level 6 of the dungeon there are four mazes (each keyed as area 6-2). These mazes are left essentially undetailed with a basic suggestion that the DM should have a mustard jelly attack the party before simply feeding random information to the players for an hour of game time before allowing them to escape each section of the maze. As an alternative, this document details
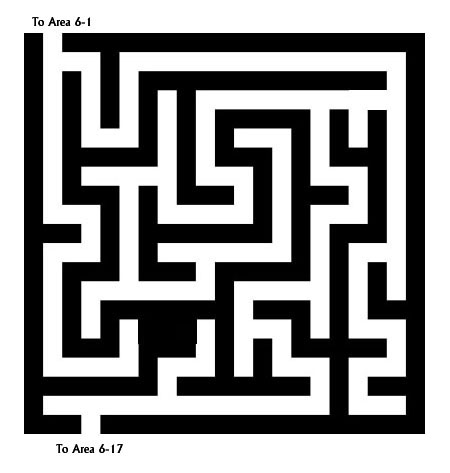
Area 6-2A -- The maze between areas 6-1 and 6-17.
Area 6-2B -- The maze between areas 6-1 and 6-3.
Area 6-2C -- The maze between areas 6-3 and 6-4.
Area 6-2D -- The maze between areas 6-3 and 6-16.
The first of these, area 6-2A, uses the suggested mustard jelly attack. The others have more unique themes and elements.
GENERAL FEATURES: The halls in each maze are 10 feet wide, unless noted otherwise. The halls are finished stone with level floors which offer good footing. See the standard features for this level of the dungeon.
DESIGN NOTES: These mazes use the style of my personal campaign notes, rather than any official style guide. In particular, you'll note the short descriptions of creature abilities designed to jog my memory at the gaming table. My goal with these mazes was to find elements which would give each maze a unique gameplay above and beyond the simple mechanics of “find your way through”.
This maze is the hunting ground of a mustard jelly. It knows the maze like the back of its hand (or it would if it had one) and will track the PCs down 1d10 rounds after they enter the maze. If necessary, it will then instinctively split into two parts, with one circling around through the maze to cut the PCs off from behind. (It doesn’t like it when its prey manages to escape.)
PILES OF BONES: In various places around the maze, the PCs will find piles of scattered, acid-scarred bones. The mustard jelly has favorite little corners it likes to digest in. None of these piles have anything valuable left in them.
MUSTARD JELLY:
Large Ooze; CR 7; HD 7d10+29; 67 hp; Initiative -5; Spd 10 ft.; AC 4 (-1
size, -5 Dex), touch 4, flat-footed 4; Base Attack +4, Grapple +11; Atk +6
melee (2d4+3 and 1d4 acid, slam); Space/Reach 10 ft./10ft.; SA improved
grab, acid, poisonous aura, constrict 2d4+3 and 1d4 acid; SQ damage
reduction 10/magic, blindsight, SR 13, cold and electrical immunity,
split, ooze qualities; SV Fort +4, Ref +3, Will +3; Str 15, Dex 1, Con 15,
Int --, Wis 1, Cha 1.
IMPROVED GRAB: After slam, automatic grapple check to hold.
CONSTRICT: If holding, automatic damage each round
ACID: Dissolves only wood and flesh
POISONOUS AURA: 10 ft. radius, affected as by slow
cast by 12th level sorcerer (Will save, DC 15, negates)
SPLIT: Any physical or electrical attack deals no damage, instead causing the
mustard jelly to split into two identical creatures, each with half of the
original creature’s hit points. A jelly with only 1 hp cannot be further
split and is destroyed.
OOZE QUALITIES: Immune to mind-influencing, poison, sleep, paralysis,
stunning, and polymorphing. Not subject to critical hits.
Area 6-2B -- Death from Above
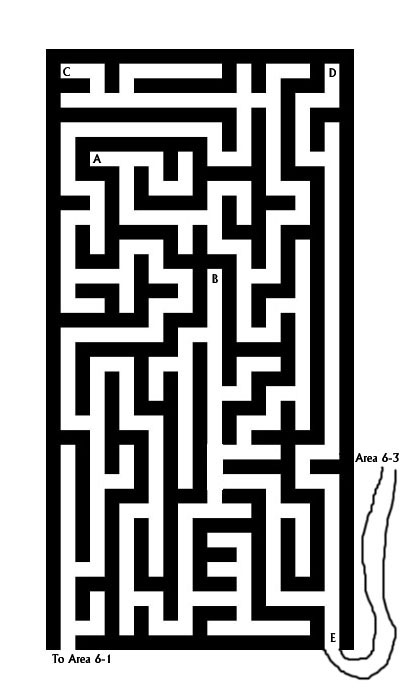
PHANTASMAL PIERCERS: This entire labyrinth is infested with phantasmal piercers. These vicious creatures are identical to normal piercers (ToH, pg. 214) except that they can become incorporeal at will. They lurk above the ceiling, where they can’t be detected, and then fall down upon their victims. If they miss, they turn incorporeal again and fall through the floor to avoid exposing their vulnerable underbellies.
In any given hallway (no matter how short), assume there are 1d10 piercers lurking above the ceiling (even if the PCs been down that hall before). Each piercer will attack a random PC. If the PCs stay in one place, they attract 1d10 piercers each minute.
POINT A (DEAD PALADIN): The body of a dead paladin lies here, although little remains beyond a moldering skeleton in rusted plate and a rotting tabard with the holy symbol of Athor. His sword, however, is gleaming and untarnished – a +2 holy longsword.
The paladin’s body is infested by a phycomid (ToH, pg. 214). Anyone drawing near will be sprayed with acid and spores.
POINT B (DEAD GOBLIN): The body of a goblin lies here. He’s been impaled by one of the phantasmal piercers, but apparently he managed to stab it with his dagger even as he was dying. The other piercers have instinctually avoided the dead body of their comrade.
This goblin was part of the goblin party now in area 6-16. When the mustard jelly attacked them in maze 6-2A, he fled north in a panic and somehow found his way through the maze. Unfortunately, he entered this maze and got himself killed.
In addition to his dagger, the goblin is wearing studded leather armor (ruined when the piercer impaled him). He carries a belt pouch with 2 gp, 15 sp, and 28 cp. He wears an eyepatch over his left eye.
POINT C (MIMIC): CR 6; Huge Aberration (Shapechanger); HD 15d8+75; 142 hp; Initiative +1; Spd 10 ft.; AC 16 (-2 size, +8 natural), touch 16, flat-footed 16; Base Attack +10, Grapple +18; Attack +19 melee (2d6+8, slam); Full Atk 2 slams; Space/Reach 10 ft./10 ft.; SA adhesive, crush; SQ darkvision 60 ft., immunity to acid, mimic shape; SV Fort +10, Ref +5, Will +9; Str 27, Dex 10, Con 21, Int 10, Wis 13, Cha 10.
Skills: Climb +21, Disguise +21, Listen +16, Spot +16
Feats: Alertness, Awesome Blow, Improved Bull Rush, Lightning Reflexes, Power Attack, Weapon Focus (slam)
AWESOME BLOW: The mimic’s Awesome Blow feat allows it to subtract 4 from its attack roll. If it hits, its opponent must make a Reflex save (DC = damage dealt) or be knocked back 10 feet, falling prone. Due to the mimic’s adhesive ability, the character will also find themselves automatically grappled and pinned
ADHESIVE: A character hit by the mimic is automatically grappled and cannot escape until the mimic is dead.
CRUSH: A mimic deals 2d6+8 points of damage with a successful grapple check. They deal this damage automatically as a free action to characters who are pinned by their awesome blow.
MIMIC SHAPE: Disguised as a large iron chest. Requires close examination, Spot vs. Disguise check, to penetrate the disguise. (By that point, it’s far too late.)
POINT D (THE SWORD AND SHIELD): Hanging on the wall at the end of this hallway there is a sword of mithril-edged adamantine and a large shield of silver. Anyone casting detect magic or identify will instantly recognize these items as being cursed: A -3 backbiting greatsword and a shield of clumsiness (-4 penalty to Dexterity and a 20% chance of spell failure).
Except they aren’t, as anyone using the items or casting analyze dweomer will quickly realize. The sword is actually a +3 ghost touch greatsword of adamantine (the mithril-edging has no mechanical effect). The shield is actually a +1 reflecting shield.
Area 6-2C -- The Haunted Labyrinth
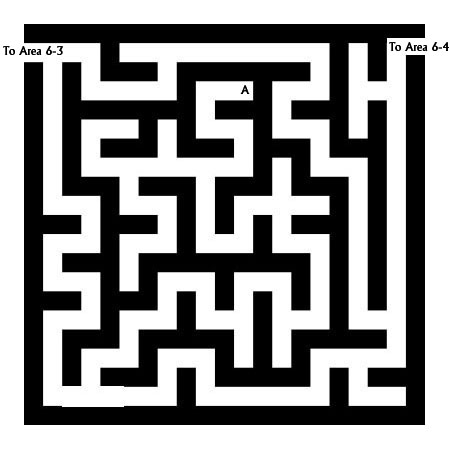
This maze is haunted by
the ghost of a long-dead wizard. Decades ago, the wizard mounted an
assault against the
The only way to grant the
wizard’s spirit its final respite is to first destroy and consecrate the
POINT A (THE WIZARD’S CORPSE): The wizard’s corpse – a dry and rotted husk – lies at this point. A search of the body will reveal a +3 ring of protection, three pearls of power (1st, 2nd, and 3rd level), a pale lavender ioun stone (8 spell levels have been absorbed), a masterwork dagger, and the wizard’s spellbook.
ERIANDOR THE GHOST (5th Level Evoker): CR 7; Medium undead (Incorporeal); HD 5d12+5; 40 hp; Initiative +1; Fly 30 ft. (perfect).; AC 16 (+1 Dex, +5 deflection); Base Attack +2, Grapple +2; Atk +3 touch (1d6 and 1d4 ability, corrupting and draining touch); Space/Reach 5 ft./5 ft.; SA corrupting touch, draining touch, malevolence, manifestation, spells; SQ rejuvenation, turn resistance +4; SV Fort +2, Ref +2, Will +6; Str 10, Dex 13, Con --, Int 19, Wis 14, Cha 20
Skills: Concentration +8, Decipher Script +12, Gather Information +8, Hide +10, Knowledge (arcana) +12, Knowledge (history) +8, Listen +14, Search +12, Spellcraft +12, Spot +14, Survival +6
Feats: Eschew material, greater spell focus (evocation), scribe scroll, silent spell, spell focus (evocation)
Arcane Spells Prepared
0th level – dancing lights (x2), detect magic, flare, ray of frost
1st level – magic missile (x2), true strike (x2)
2nd level – darkness, scorching ray (x2), see invisibility
3rd level – arcane sight, fireball (x2)
Area 6-2D -- The Rat Warren
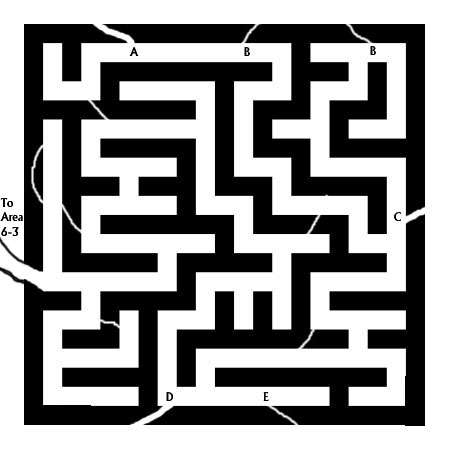
This entire maze has become infested with rats. Check for a wandering monster every time the PCs pass the entrance to a rat tunnel and once for every five minutes they spend in the maze. The rats here will generally not seek combat unless threatened or cornered, but if the PCs kill any rats, any rats they meet from that point on will be automatically hostile.
1-4 3d6 normal rats
5 2d6 normals rats and 1d6 dire rats
6-20 No encounter
POINT A: This rat tunnel is abnormally large. Small characters can move normally; Medium-size characters can hunch over in them; and Large characters can crawl through it. The tunnel descends underneath area 6-3 before curving back around and up into area 6-3 through one of the rat tunnels shown on the map there.
POINT B: These tunnels lead to a twisting maze of rat warrens. Any character entering the tunnel has a 50% chance of ending up back where they started and a 50% chance of ending up at the other location marked B on the map. Assume a trip through these tunnels takes 3d6 minutes.
POINT C: This abnormally large rat tunnel (see point A, above) twists and turns for perhaps two dozen yards before ending in a small cavern which serves as the den of an ancient, crippled wererat by the name of Damien. His fur has turned entirely gray and his eyes are the milky-white of the blind. He is tended by the rats of this maze, and if the PCs have harmed any of them he will be automatically distrustful and hostile towards them.
Otherwise, if they handle the encounter correctly, the PCs could gain valuable information from this craft old rat (in exchange for precious metals and pretty baubles; or a vow to destroy the Spider Queen, see below).
BACKGROUND: Damien was outcast from the wererat pack on Level 1 years ago, after angering the Spider Queen on Level 6A. The Spider Queen had him hurled from her lair, shattering his bones on the cold stone of area 6A-1. Damien was carried away to safety by his faithful rats, but he has (naturally) carried a burning resentment towards the Spider Queen and her minions ever since.
INFORMATION: Damien can give the PCs a wide range of information:
· He knows five rumors from the rumor tables for the dungeon.
· He can give the PCs detailed information on the entirety of Level 6A, although any maps he draws for the PCs will be inaccurate in several regards (it’s been years since he was down there). In addition, while he’s aware of the “wizard tombs” on the level, he and the other rats always kept a healthy distance from them.
· He CAN’T tell the PCs how to get to Level 6A. His rats collapsed the rat tunnels leading there when they brought him here.
· He also knows the entirety of Level 6 with the exception of areas 6-7 and 6-8 (neither he nor his rats have ever dared the tombs) and the mazes at 6-2A and 6-2B (although he knows about the mustard jelly and the phantasmal piercers – they’re specifically why he and his rats don’t go into those mazes). He can give the PCs very accurate maps of 6-2C and 6-2D.
· Damien knows that the river flowing through 6-16 and 6-14 passes down through Level 7A to “a place of death” (rats don’t come back). He knows that the sinkhole in 6-15 leads to “the gates of hell” (he’s seen them). And he knows that the cave in 6-10 leads down to “a bunch of caves which are nice, but far too difficult to get to”.
STATS: Use the standard wererat stats from the MM.
TREASURE: Secreted away amongst the general filth of Damien’s den there a number of gems, trinkets, and coins, with a total worth of perhaps 250 gp. Damien guards his “horde” zealously.
EXITS: Several rat tunnels lead away from this den before ending up in Area 6-16. Damien is very concerned at the thought of the goblins in 6-16 exploring these tunnels and finding his den, so large packs of dire rats have been patrolling those tunnels and attack anything coming through them.
POINT D: This abnormally large rat tunnel (see point A, above), continues for about fifteen feet before narrowing down to a normal size. After ten feet it takes a sharp turn to the left and then widens out again, leading to the western-most rat tunnel on the north side of area 6-16.
POINT E: This rat tunnel leads to a twisting maze of rat warrens with no other exit. Anyone going in wanders for 3d6 minutes only to emerge back at this point again.