![]()
|
|
|
|
|
|
November 2005
|
"Like what? Thor the God of Thunder riding at the head of a team of a billion valkyries and the entire U.N.S. fleet? Flanked perhaps by an army of flying reindeer led by Gandalf the Grey and a cyborg Santa Claus?" - Schlock Mercenary |
| November 15th, 2005
I've spent most of my free time for the past two weeks prepping what I hope will turn out to be a really fantastic D&D campaign. It started life as an Order of the Stick-inspired desire to do some old school dungeon-crawling. I've been aching to return to Rappan Athuk, one of the greatest dungeons ever designed, ever since I ran a very successful one-on-one session with my good friend Dave Blackmer a couple years back. So I picked up my Rappan Athuk modules and started prepping a barebones setting to drop the dungeon into. As I worked, though, it didn't take long for my quick, barebones preparation to become increasingly elaborate and detailed. In addition to a plethora of original work, the campaign now includes material incorporated from The Crucible of Freya, The Vault of Larin Karr, The Tomb of Abysthor, Demons and Devils, Demon God's Fane, Beyond the Veil, and more. Putting the best of Necromancer Games and Monte Cook together in one room has created a truly remarkable synergy that's really gotten my own creative juices flowing. In a couple of days I'm hoping to have a new sub-level for Rappan Athuk that I've prepped converted into a "suitable for general comprehension" format so that I can share it here. But I'm in a roleplaying mood, so I thought I'd share something else with you. On Halloween this year, Wizards of the Coast posted Bruce Cordell's v3.5 conversion of Gygax's classic Tomb of Horrors. For those of you unfamiliar with the Tomb, the module was first released in 1978 as one of the first modules available for the AD&D game, after being used for the Official D&D tournament held at the very first Origins convention. At the time it was a fairly innovative product: In addition to the "map and key" presentation which was standard for the time, Tomb of Horrors also came with a pamphlet of forty illustrations, each presenting some part of the module which could be shown to the players at the appropriate time. But it wasn't the illustrations which made the Tomb a classic: It was the deathtraps. No module has left more characters cowering in terror, unable to open the next door out of sheer fear of the doom that surely awaits them, than the Tomb of Horrors. A couple of years ago I did my own v3.5 conversion of the infamous Tomb. My version went a bit further than Cordell's has, largely because there is a very significant and very legitimate critique of the Tomb: There are many places where the module just doesn't play fair. The Tomb is more effective if the players can look back and regret the choices they made because they could have made a different choice. The Tomb as written, unfortunately, features many junctions where death is simply capricious. Opening a random door with an undetectable and inescapable death trap isn't as much fun as opening a door that triggers a trap you can desperately attempt to escape. My version of the module doesn't make things any easier (in fact, it often makes it more difficult) -- but it does play fair. So that, when death comes, the players will feel terror, not resentment. In my version I also focused the module on its trademark traps: Combat, already rare in the original Tomb, is rarer still. And always a result of a trap or trap-mentality. Most importantly, I include boxed text -- making it very easy to make sure you're giving precisely the right information about each area to the PCs (and no more). For the past couple of years, I sporadically tried to get various people interested in publishing an updated version of the Tomb. There didn't seem to be any interest. So I'm delighted that Cordell's version has seen the light of day. Even if I'm secretly bitter and resentful that it wasn't mine. (Okay, there's not really any bitter resentment. A little secret disappointment, perhaps.) But rather than letting my version of the Tomb molder on my hard drive, I'm going to share it with you here: You'll also want to grab either the original module or Return to the Tomb of Horrors (which includes a facsimile of the original module) for the original handouts. These handouts can also be found in the Bruce Cordell version, interspersed throughout the text. If you end up running my version, I'd be very interested in hearing how it went. This adventure can be a lot of fun when used a one-shot. I'll frequently pull it out if some of my players can't show up for the game. To give you some idea of what you'll find inside, let me present a sample area from the module: Area 7 - The Forsaken Prison This chamber is a 15’ by 15’ shaft 100’ deep, carved out of solid granite. Characters teleporting to this area from the Arch of Mist (Area 5) materialize at the top of the shaft and automatically plummet to the bottom of the shaft, taking 10d6 points of falling damage. TRAP DOOR: The trap door here is illusion protected and also requires a Search check (DC 25) to detect. There is no way to determine that the lever is the triggering mechanism, but the trap door itself can be prevented from opening with a successful Disable Device check (DC 25). After 1d10 rounds, the trap door resets itself and can only be opened by pulling the first lever (which is now on the other side of the trap door of solid stone). SECOND LEVER: At the bottom of the second shaft is another lever built into the wall. This lever – in all ways – appears to be identical to the first lever above. Pulling this lever, however, opens a secret door in the ceiling of the shaft leading to a crawl space (see below). FLOOR: The floor of the second shaft is also a trap door, illusion protected and requiring a Search check (DC 25) to detect. And there is also another 100’ shaft below this trap door. But there is not, in fact, any triggering mechanism which opens this trap door. WALLS: The walls are carved straight out of the rock face and smoothed. Scaling them requires a Climb check (DC 30). SECRET DOOR: To find the secret door in the ceiling of the shaft before opening it requires a Search check (DC 25). The door is a solid slab of granite about 2’ thick (360 hp, hardness 8) and can only be opened by pulling the second lever. After 1d10 rounds, the secret door will close itself and can only be opened again by pulling the second lever. CRAWL SPACE: The crawl space beyond the secret door is very narrow. See Area 3 for a complete description.
|
| November 18th, 2005
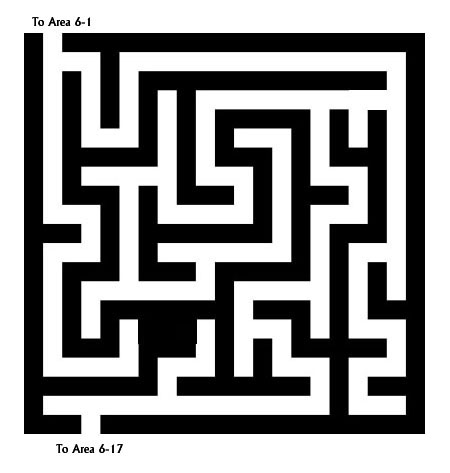
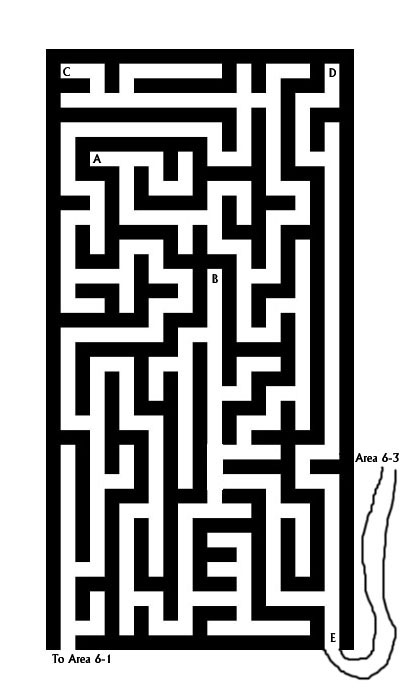
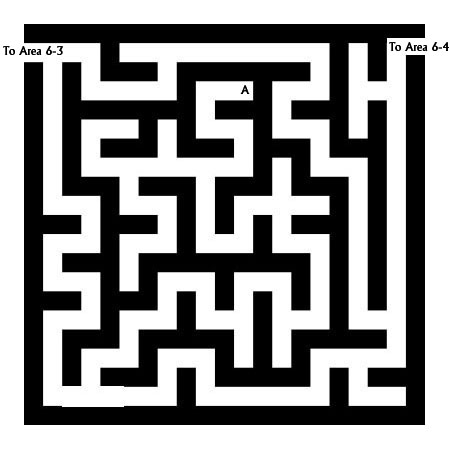
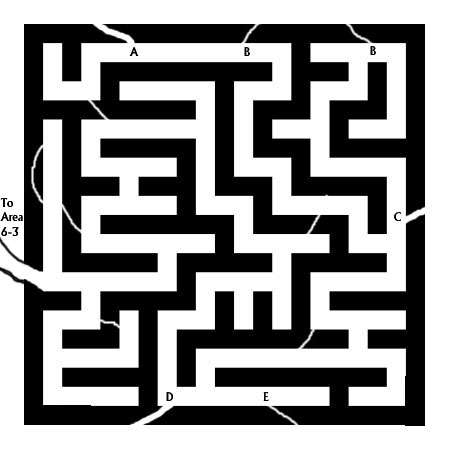
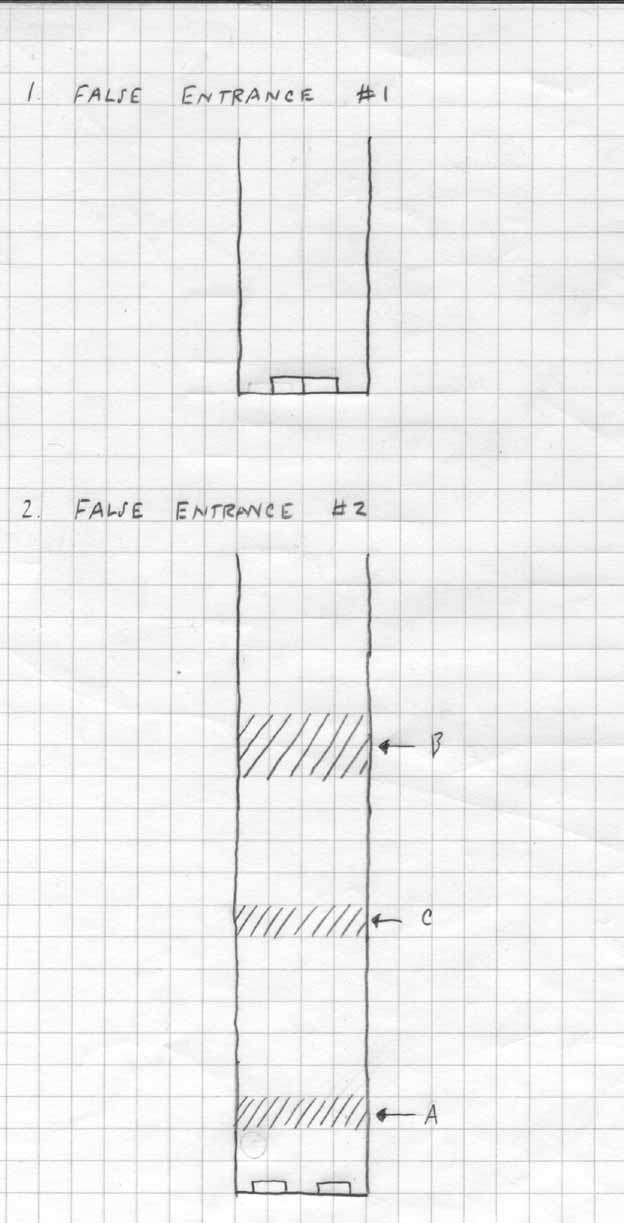
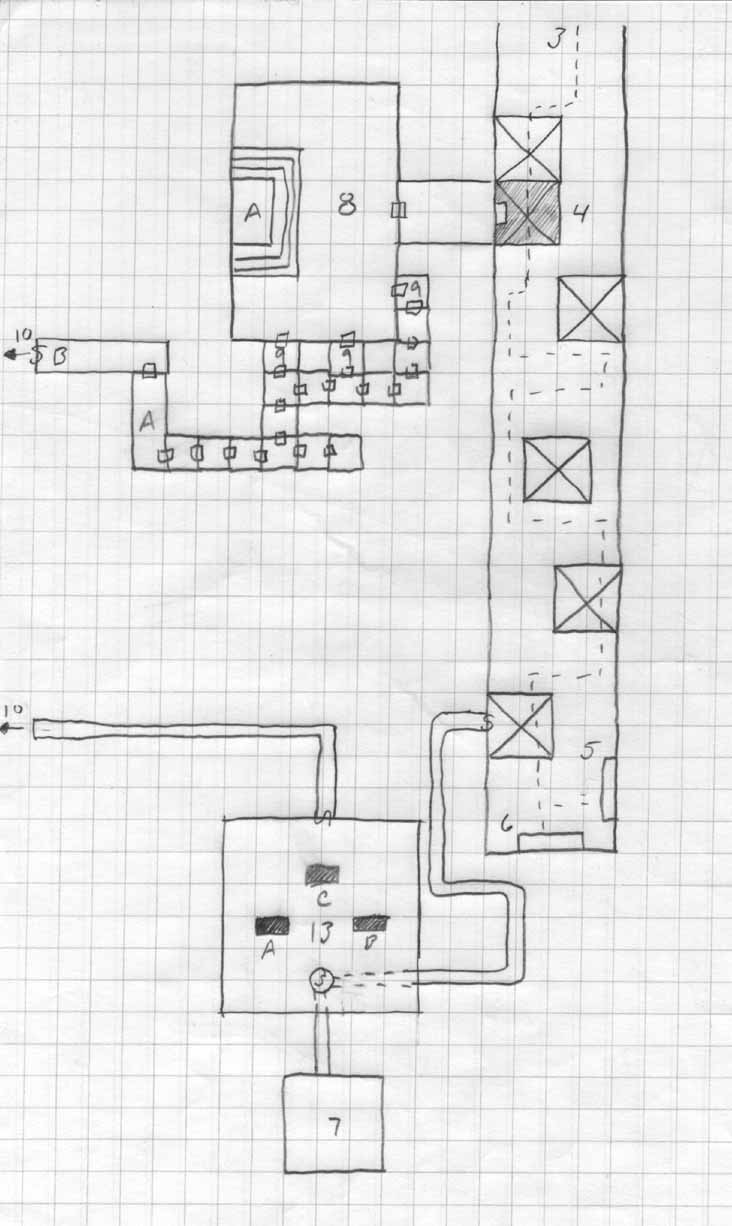
I still need to clean-up that Rappan Athuk sub-level I mentioned on Tuesday, but in the meantime I thought I'd offer up some other supplemental material for the Rappan Athuk modules. There will be some obvious spoilers here, so I encourage anyone who might be playing in these modules to ignore the next few posts. On Level 6 of Rappan Athuk, there are four mazes (each keyed as area 6-2). These mazes are left essentially undetailed with a basic suggestion that the DM should have a mustard jelly attack the party before simply feeding random information to the players for an hour of game time before allowing them to escape each section of the maze. As an alternative, I've prepared four maze sections: Area 6-2A -- The maze between areas 6-1 and 6-17. Area 6-2B -- The maze between areas 6-1 and 6-3. Area 6-2C -- The maze between areas 6-3 and 6-4. Area 6-2D -- The maze between areas 6-3 and 6-16. The first of these, area 6-2A, uses the suggested mustard jelly attack. The others, which I'll post over the next couple of days, have more unique themes and elements. I should also note that these mazes use the style of my personal campaign notes, rather than any official style guide. In particular, you'll note the short descriptions of creature abilities designed to jog my memory at the gaming table. The halls in each maze are 10 feet wide. This material is covered by the Open Gaming License. Area 6-2A -- The Mustard Jelly Maze
This maze is the hunting ground of a mustard jelly. It knows the maze like the back of its hand (or it would if it had one) and will track the PCs down 1d10 rounds after they enter the maze. If necessary, it will then instinctively split into two parts, with one circling around through the maze to cut the PCs off from behind. (It doesn’t like it when its prey manages to escape.) PILES OF BONES: In various places around the maze, the PCs will find piles of scattered, acid-scarred bones. The mustard jelly has favorite little corners it likes to digest in. None of these piles have anything valuable left in them. MUSTARD JELLY:
Large Ooze; CR 7; HD 7d10+29; 67 hp; Initiative -5; Spd 10 ft.; AC 4 (-1
size, -5 Dex), touch 4, flat-footed 4; Base Attack +4, Grapple +11; Atk +6
melee (2d4+3 and 1d4 acid, slam); Space/Reach 10 ft./10ft.; SA improved
grab, acid, poisonous aura, constrict 2d4+3 and 1d4 acid; SQ damage
reduction 10/magic, blindsight, SR 13, cold and electrical immunity,
split, ooze qualities; SV Fort +4, Ref +3, Will +3; Str 15, Dex 1, Con 15,
Int --, Wis 1, Cha 1.
IMPROVED GRAB: After slam, automatic grapple check to hold.
CONSTRICT: If holding, automatic damage each round
ACID: Dissolves only wood and flesh
POISONOUS AURA: 10 ft. radius, affected as by slow
cast by 12th level sorcerer (Will save, DC 15, negates)
SPLIT
: Any physical or electrical attack deals no damage, instead causing the
mustard jelly to split into two identical creatures, each with half of the
original creature’s hit points. A jelly with only 1 hp cannot be further
split and is destroyed.
OOZE QUALITIES: Immune to mind-influencing, poison, sleep, paralysis,
stunning, and polymorphing. Not subject to critical hits.
|
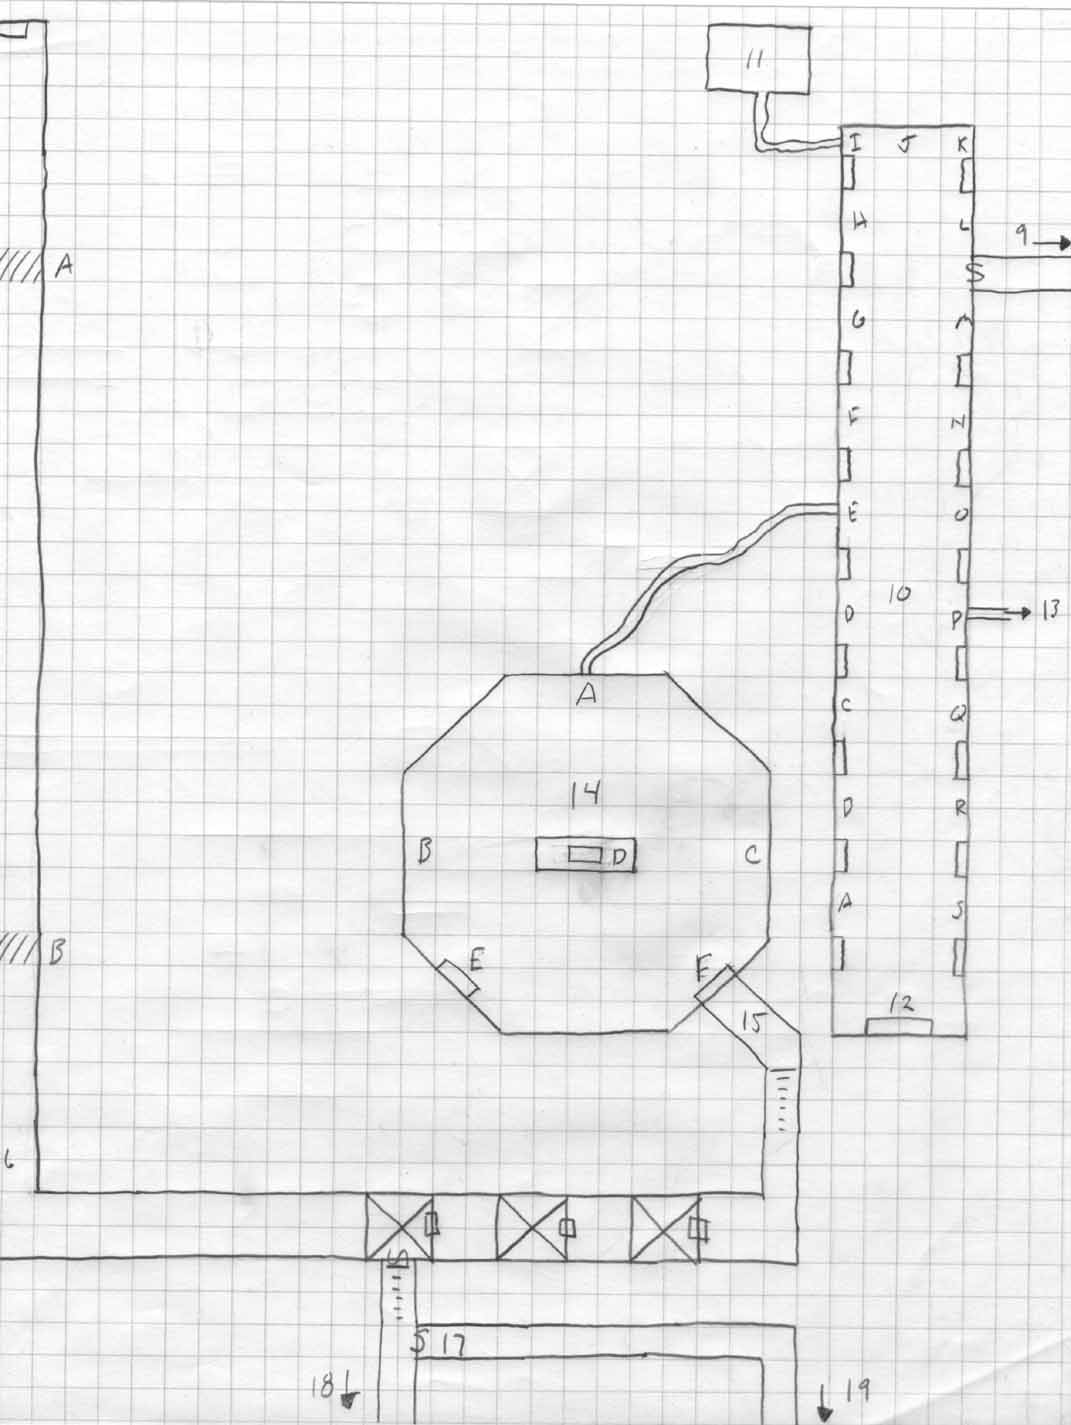
| November 19th, 2005
Hey, the e-mail address through the Contact link works now. Apparently, if you spell Alexandrian without the "r", the Internet will not magically read your mind and deliver your mail unerringly. Stupid Internet. ..... Right. Shall we take a look at the second maze, then? I think we shall. (Thanks to Sarah for pointing out this egregious error.) Area 6-2B -- Death from Above
PHANTASMAL PIERCERS: This entire labyrinth is infested with phantasmal piercers. These vicious creatures are identical to normal piercers (ToH, pg. 214) except that they can become incorporeal at will. They lurk above the ceiling, where they can’t be detected, and then fall down upon their victims. If they miss, they turn incorporeal again and fall through the floor to avoid exposing their vulnerable underbellies. In any given hallway (no matter how short), assume there are 1d10 piercers lurking above the ceiling (even if the PCs been down that hall before). Each piercer will attack a random PC. If the PCs stay in one place, they attract 1d10 piercers each minute. POINT A (DEAD PALADIN): The body of a dead paladin lies here, although little remains beyond a moldering skeleton in rusted plate and a rotting tabard with the holy symbol of Athor. His sword, however, is gleaming and untarnished – a +2 holy longsword. The paladin’s body is infested by a phycomid (ToH, pg. 214). Anyone drawing near will be sprayed with acid and spores. POINT B (DEAD GOBLIN): The body of a goblin lies here. He’s been impaled by one of the phantasmal piercers, but apparently he managed to stab it with his dagger even as he was dying. The other piercers have instinctually avoided the dead body of their comrade. This goblin was part of the goblin party now in area 6-16. When the mustard jelly attacked them in maze 6-2A, he fled north in a panic and somehow found his way through the maze. Unfortunately, he entered this maze and got himself killed. In addition to his dagger, the goblin is wearing studded leather armor (ruined when the piercer impaled him). He carries a belt pouch with 2 gp, 15 sp, and 28 cp. He wears an eyepatch over his left eye. POINT C (MIMIC): CR 6; Huge Aberration (Shapechanger); HD 15d8+75; 142 hp; Initiative +1; Spd 10 ft.; AC 16 (-2 size, +8 natural), touch 16, flat-footed 16; Base Attack +10, Grapple +18; Attack +19 melee (2d6+8, slam); Full Atk 2 slams; Space/Reach 10 ft./10 ft.; SA adhesive, crush; SQ darkvision 60 ft., immunity to acid, mimic shape; SV Fort +10, Ref +5, Will +9; Str 27, Dex 10, Con 21, Int 10, Wis 13, Cha 10. Skills: Climb +21, Disguise +21, Listen +16, Spot +16 Feats: Alertness, Awesome Blow, Improved Bull Rush, Lightning Reflexes, Power Attack, Weapon Focus (slam) AWESOME BLOW: The mimic’s Awesome Blow feat allows it to subtract 4 from its attack roll. If it hits, its opponent must make a Reflex save (DC = damage dealt) or be knocked back 10 feet, falling prone. Due to the mimic’s adhesive ability, the character will also find themselves automatically grappled and pinned ADHESIVE: A character hit by the mimic is automatically grappled and cannot escape until the mimic is dead. CRUSH: A mimic deals 2d6+8 points of damage with a successful grapple check. They deal this damage automatically as a free action to characters who are pinned by their awesome blow. MIMIC SHAPE: Disguised as a large iron chest. Requires close examination, Spot vs. Disguise check, to penetrate the disguise. (By that point, it’s far too late.) POINT D (THE SWORD AND SHIELD): Hanging on the wall at the end of this hallway there is a sword of mithril-edged adamantine and a large shield of silver. Anyone casting detect magic or identify will instantly recognize these items as being cursed: A -3 backbiting greatsword and a shield of clumsiness (-4 penalty to Dexterity and a 20% chance of spell failure). Except they aren’t, as anyone using the items or casting analyze dweomer will quickly realize. The sword is actually a +3 ghost touch greatsword of adamantine (the mithril-edging has no mechanical effect). The shield is actually a +1 reflecting shield.
|
| November 20th, 2005
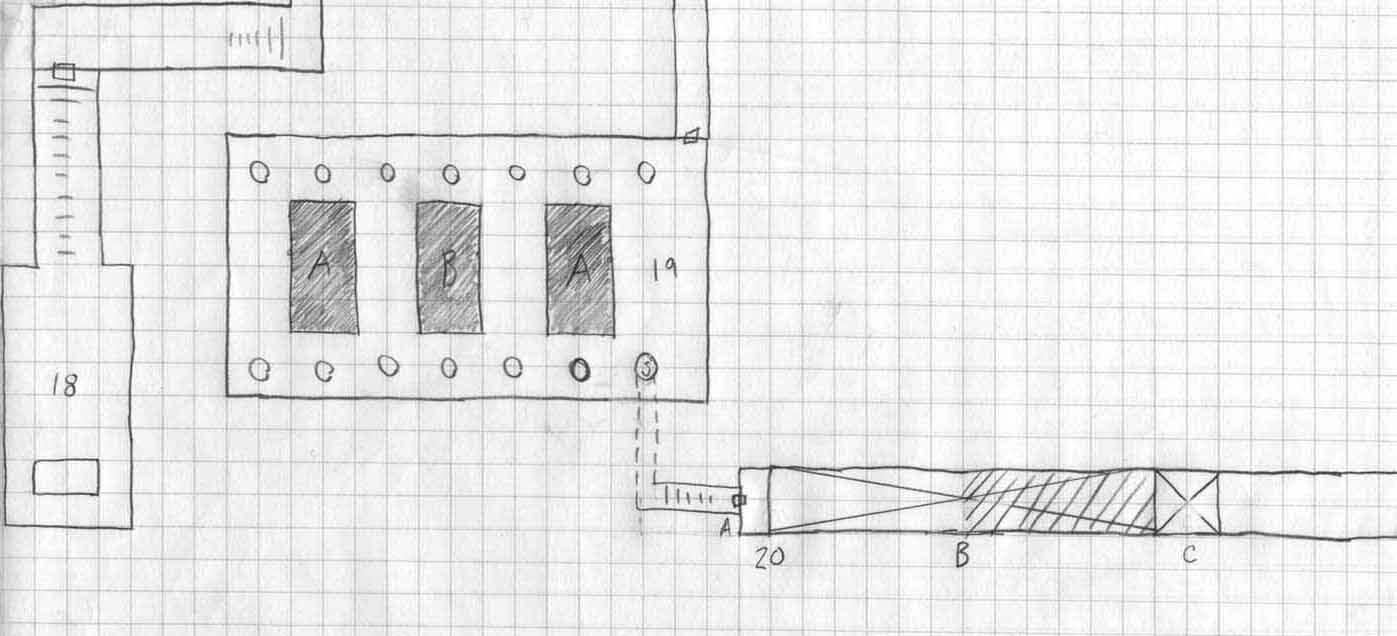
Area 6-2C -- The Haunted Labyrinth
This maze is haunted by
the ghost of a long-dead wizard. Decades ago, the wizard mounted an
assault against the The only way to grant the
wizard’s spirit its final respite is to first destroy and consecrate the
POINT A (THE WIZARD’S CORPSE): The wizard’s corpse – a dry and rotted husk – lies at this point. A search of the body will reveal a +3 ring of protection, three pearls of power (1st, 2nd, and 3rd level), a pale lavender ioun stone (8 spell levels have been absorbed), a masterwork dagger, and the wizard’s spellbook. ERIANDOR THE GHOST (5th Level Evoker): CR 7; Medium undead (Incorporeal); HD 5d12+5; 40 hp; Initiative +1; Fly 30 ft. (perfect).; AC 16 (+1 Dex, +5 deflection); Base Attack +2, Grapple +2; Atk +3 touch (1d6 and 1d4 ability, corrupting and draining touch); Space/Reach 5 ft./5 ft.; SA corrupting touch, draining touch, malevolence, manifestation, spells; SQ rejuvenation, turn resistance +4; SV Fort +2, Ref +2, Will +6; Str 10, Dex 13, Con --, Int 19, Wis 14, Cha 20 Skills: Concentration +8, Decipher Script +12, Gather Information +8, Hide +10, Knowledge (arcana) +12, Knowledge (history) +8, Listen +14, Search +12, Spellcraft +12, Spot +14, Survival +6 Feats: Eschew material, greater spell focus (evocation), scribe scroll, silent spell, spell focus (evocation) Arcane Spells Prepared 0th level – dancing lights (x2), detect magic, flare, ray of frost 1st level – magic missile (x2), true strike (x2) 2nd level – darkness, scorching ray (x2), see invisibility 3rd level – arcane sight, fireball (x2)
|
| November 21st, 2005
Area 6-2D -- The Rat Warren
This entire maze has become infested with rats. Check for a wandering monster every time the PCs pass the entrance to a rat tunnel and once for every five minutes they spend in the maze. The rats here will generally not seek combat unless threatened or cornered, but if the PCs kill any rats, any rats they meet from that point on will be automatically hostile. 1-4 3d6 normal rats 5 2d6 normals rats and 1d6 dire rats 6-20 No encounter POINT A: This rat tunnel is abnormally large. Small characters can move normally; Medium-size characters can hunch over in them; and Large characters can crawl through it. The tunnel descends underneath area 6-3 before curving back around and up into area 6-3 through one of the rat tunnels shown on the map there. POINT B: These tunnels lead to a twisting maze of rat warrens. Any character entering the tunnel has a 50% chance of ending up back where they started and a 50% chance of ending up at the other location marked B on the map. Assume a trip through these tunnels takes 3d6 minutes. POINT C: This abnormally large rat tunnel (see point A, above) twists and turns for perhaps two dozen yards before ending in a small cavern which serves as the den of an ancient, crippled wererat by the name of Damien. His fur has turned entirely gray and his eyes are the milky-white of the blind. He is tended by the rats of this maze, and if the PCs have harmed any of them he will be automatically distrustful and hostile towards them. Otherwise, if they handle the encounter correctly, the PCs could gain valuable information from this craft old rat (in exchange for precious metals and pretty baubles; or a vow to destroy the Spider Queen, see below). BACKGROUND: Damien was outcast from the wererat pack on Level 1 years ago, after angering the Spider Queen on Level 6A. The Spider Queen had him hurled from her lair, shattering his bones on the cold stone of area 6A-1. Damien was carried away to safety by his faithful rats, but he has (naturally) carried a burning resentment towards the Spider Queen and her minions ever since. INFORMATION: Damien can give the PCs a wide range of information: · He knows five rumors from the rumor tables for the dungeon. · He can give the PCs detailed information on the entirety of Level 6A, although any maps he draws for the PCs will be inaccurate in several regards (it’s been years since he was down there). In addition, while he’s aware of the “wizard tombs” on the level, he and the other rats always kept a healthy distance from them. · He CAN’T tell the PCs how to get to Level 6A. His rats collapsed the rat tunnels leading there when they brought him here. · He also knows the entirety of Level 6 with the exception of areas 6-7 and 6-8 (neither he nor his rats have ever dared the tombs) and the mazes at 6-2A and 6-2B (although he knows about the mustard jelly and the phantasmal piercers – they’re specifically why he and his rats don’t go into those mazes). He can give the PCs very accurate maps of 6-2C and 6-2D. · Damien knows that the river flowing through 6-16 and 6-14 passes down through Level 7A to “a place of death” (rats don’t come back). He knows that the sinkhole in 6-15 leads to “the gates of hell” (he’s seen them). And he knows that the cave in 6-10 leads down to “a bunch of caves which are nice, but far too difficult to get to”. STATS: Use the standard wererat stats from the MM. TREASURE: Secreted away amongst the general filth of Damien’s den there a number of gems, trinkets, and coins, with a total worth of perhaps 250 gp. Damien guards his “horde” zealously. EXITS: Several rat tunnels lead away from this den before ending up in Area 6-16. Damien is very concerned at the thought of the goblins in 6-16 exploring these tunnels and finding his den, so large packs of dire rats have been patrolling those tunnels and attack anything coming through them. POINT D: This abnormally large rat tunnel (see point A, above), continues for about fifteen feet before narrowing down to a normal size. After ten feet it takes a sharp turn to the left and then widens out again, leading to the western-most rat tunnel on the north side of area 6-16. POINT E: This rat tunnel leads to a twisting maze of rat warrens with no other exit. Anyone going in wanders for 3d6 minutes only to emerge back at this point again.
|
|
November 23rd, 2005
In Rappan Athuk there are three groups of "lost goblins" in the upper levels of the dungeon. They're found in areas 4A-3F, 6-16, and 7A-6. These groups serve as excellent foreshadowing for the lower levels of the dungeon, but they also present some troublesome problems for the DM. In short, their presence in the upper levels is not fully explained nor, even upon closer examination, particularly explicable. For example, the goblins in area 4A-3F are said to have "come up from Level 12A via 7A and are afraid to go back because of the basilisks". This is problematic because there isn't a direct route between Level 12A and Level 7A, nor is there any particularly obvious indirect route they might have followed, either. This group can be fixed relatively easily by saying: " "These goblins were exploring up from 10A. They followed the river up to the hot springs on Level 9A, crossed the cavern, took the stairs up to 7A, became lost in the Minotaur’s Maze. Fled up the old rat tunnel to this level, where they emerged in the basilisk’s lair. They fled from that with three casualties (the goblin statues in 4A-2C) and are now holed up here." (You'll need to add the appropriate goblin statues to area 4A-2C.) This explanation also neatly takes care of the goblins in area 7A-6: They could have easily been part of the group who tried to reach level 4A, only these goblins fled back down to Level 7A and are now stuck between a rock, a hard place, and another rock. (You simply ignore the text which suggests that this is some kind of "outpost" from which surface raids are conducted. Given the complete absence of any route to the surface from Level 7A, this explanation of the goblin's presence never made any sense.) But the goblins in area 6-16 are simply intractable. The
module says they "became lost in this level's mazes and have been
unable to escape". The Solution THE RIVER: The river on Level 6 should be changed so that it flows down to area 7A-9, through 7A-3, and then down to 10A-5. EXPLORATORY PARTY: About three weeks ago, a large goblin exploratory party came up from Level 10A looking for new mineral veins to explore. They were led by Shana, a Mining Captain, and Ubar, a goblin wizard. They followed the river up to the hot springs on Level 9A, crossed the cavern, and then took the stairs up to Level 7A. There, unfortunately, they became lost in the labyrinths of the Phase Minotaur King. DISASTER: The party stumbled into area 7A-3 where they were attacked by the phase minotaurs and suffered heavy casualties. As they fled in a near-rout, the group split: One half of the group, with Shana, fled south back through the mazes. The other group, led by Ubar, fled north along the river. UBAR'S GROUP: This group followed the river all the way to area 6-16. Ubar attempted to lead the goblins out of this cave, but was badly beaten by the mustard jelly in maze 6-2A. The group retreated back to 6-16 where they've been holed up ever since. See the module description of this encounter. Ubar is an evil and xenophobic goblin, making him automatically hostile and inimical to any outsiders. SHANA'S GROUP: Shana's group reached area 7A-5 and attempted to flee up the rat tunnels to Level 4A. There, unfortunately, they emerged into the basilisk lair (area 4A-2C). Three goblins were petrified by the basilisks, sending the group into a new panic. Six of the goblins fled deeper into Level 4A (ending up in area 4A-3F). Shana led the bulk of her group back down to Level 7A... where they are slowly starving to death in area 7A-6. INFORMATION: The goblins can tell the PCs about the goblin city on Level 12A and the goblin mining camps on Level 10A. They can also tell them of their cursory experiences on level 9A. They can also warn the PCs about the phase minotaurs, of course. Ubar's group believes that Shana's group was entirely wiped out by the phase minotaurs. Ubar's group also knows about the will-o-wisps in 6-12 and the mustard jelly in 6-2A. Shana's group knows that Ubar's group escaped up the river. They also know about the basilisks on Level 4A (and won't hesitate to use those basilisks as a trap for unwary PCs). They think its possible that a few of their number might have escaped the basilisks. The lost goblins in area 4A-3F know that the rest of Shana's group escaped back down to Level 7A.
|
|
RETURN TO THE ALEXANDRIAN - SUBSCRIBE
|