![]()
|
|
|
|
|
|
June 2008
PART 1 - PART 2 - PART 3 - PART 4
|
"Diablo II. It's all about clicking on tacky little pictures. Like playing Windows, really." - Lost Cub, RPGNet |
|
June 6th, 2008
REMIXING KEEP ON THE SHADOWFELL We're going to continue our remix of Keep on the Shadowfell by looking at the kobold lair. This is the area made up of encounters A2 and A3 in the original module.
KOBOLDS - BACKGROUND The kobold tribe is known as the Clan of the Withered Arm. Once in every generation a child of the clan is born with a withered arm, marking them as the future leader of the clan. The clan's history in the area around Winterhaven actually dates back more than 25 years to a time period when they were driven from their ancestral lands by Necross the Black Mage. The villagers in Winterhaven, however, were largely unaware of their presence: They survived by hunting wild game and generally shunned contact with the civilized races (who they had learned to fear). Kalarel's arrival in the area changed all that. He sent one of his goblin lackeys -- brutish oaf named Irontooth -- with a band of thugs to take control of the kobolds. They took the kobolds by surprise, overpowered their leader (a kobold named Issitik), and chopped off his arm. Irontooth now wears the withered arm on a chain about his neck.
THE KOBOLD LAIR - OUTSIDE
Encounter A2: The Kobold Lair - Outside is going to remain largely unchanged. In fact, the only major thing we're going to do here is add a little extra flavor to the sacred circle:
TRACKS: A successful Perception check (DC 10) allows a character to notice the large number of kobold tracks in the soft mud along the river bank leading to and from the waterfall. A DC 22 check reveals a few goblin tracks mixed in with the kobold tracks. WATERFALL: In addition to acting as difficult terrain, the roaring noise of the waterfall imposes a -5 penalty to Perception checks on characters within 4 squares. It imposes a -20 penalty to Perception checks made to hear anything happening on the other side of the waterfall.
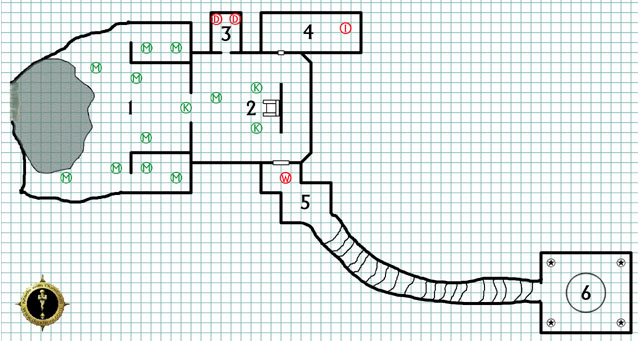
THE KOBOLD LAIR - PROBLEM AREAS This inside of the kobold lair, however, needs a lot more work. Notable problems include: (1) The encounter descriptions claim that the only entrance into the lair is through the waterfall. The actual battlemap, however, depicts two other entrances. (2) The edges of the map are left completely open. In fact, you can come in through one entrance, turn immediately to the left, move one square, and... disappear off the edge of the map. Not only does this imply that there's more to the lair than what's described in the module, it also makes this encounter almost impossible to run: Players are going to immediately be asking what they're not seeing off the edges of the map. Can they maneuver back there? Is there anything valuable? Are there more creatures? And so forth. (3) The map also shows a huge pile of treasure that fills 400 square feet.
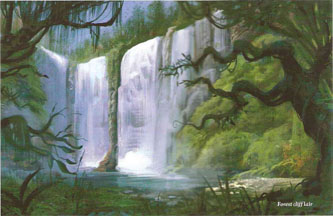
However, the module claims -- and I wish I was kidding about this -- that abolutely none of the gold you see there is valuable. The only valuable stuff is in the chest: 420 gp and a suit of magical armor. There is absolutely nothing wrong with the amount of treasure listed in the module. (Although why Irontooth isn't wearing the magical armor instead of sticking it in the chest is a bit of an open question.) But you just cannot show your players a picture of 400 square feet of gold and then say, "Ha ha! Just kidding!" (4) The kobolds are supposed to attack in two waves spaced 3 rounds apart. But a single move action from any of the entrances into the lair will put a PC in a location where they can see the kobolds in the second wave. What are these kobolds doing? Are they just standing there? Are they putting on their armor (giving the PCs a potential advantage if they engage early)? The players are going to want to know. For the most part we're not going to change the fundamental dynamic of this encounter, but we are going to clean it up. First, when running the outside portion of the encounter leave the battlemap folded in half (so that the inside portion of the lair cannot be seen by the players). Ignore the two additional entrances to the kobold lair and describe that entire side of the area as being a mossy cliff face. Second, the beautiful color illustration of the waterfall in the module doesn't match the battlemap. (Yet another example of the sloppy production quality of this product.) However, if you can make a high-quality copy of this illustration and then trim the left half of the image you should end up with a pretty good handout. Third, we're going to scrap the entire interior map of the kobold lair and replace it with a new one that actually makes sense; supports the attack waves designed into the encounter; and also includes more flavor.
THE KOBOLD LAIR - INSIDE THE LAIR
TACTICS - SURPRISED: If the kobolds are surprised in their lair, the kobolds attack in two waves as described in the module. The initial locations of the first wave are indicated on the map in green and the initial locations of the second wave are indicated in red. The dragonshields and Irontooth are sleeping when the PCs arrive. It takes them 1 round to wake up; 1 round to realize what's happening; and then 1 round to grab their weapons. (If the PCs reach them before the second wave is triggered, they probably won't be armed.) The wyrmpriest's delay is merely due to hesitation. If the PCs burst in on him, he is fully prepared to defend himself. TACTICS - FOREWARNED: If any of the kobolds outside the lair manage to flee into the lair, this encounter becomes much more difficult. The minions and skirmishers will have all gathered in area 1. The wyrmpriest will have moved to the archway leading from area 1 to area 2, positioning himself so that he can use both his energy orb and incite faith abilities to aid the other kobods. Irontooth, flanked by the dragonshields, will be sitting in the throne in area 2 wearing the withered arm about his neck. ("You fools. Orcus will not tolerate your meddling. Kill them all.") The dragonshields and Irontooth will hold back, but if it looks like the PCs are getting the upper hand (or if the PCs try to attack Irontooth) they'll move to engage. AREA 1 - THE UNNATURAL CAVE: The pool behind the waterfall is relatively calm and shallow, allowing characters to pass through it normally (although the squares of the waterfall itself are difficult terrain, see Outside the Lair). The kobolds will immediately move to attack intruders (see Tactics, above).
A few of the more favored kobolds roost in the antechambers here. (The rest of the kobolds make their nests in treetops throughout the area.) AREA 2 - THE THRONE ROOM: The fire glowgem on the back of the throne casts a bright light to a distance of 20 squares. It can be pried loose and is worth 500 gp. A Nature check (DC 18) reveals that such thrones are often used as part of druidic initiation rituals. AREA 3 - DRAGONSHIELD LAIR: The two dragonshields here betrayed Issitik when Irontooth and the goblins came. As a result, they were given a place of honor.
AREA 4 - IRONTOOTH'S LAIR: This was once a library maintained by the Vassals of the Verdant Lord. The books here were protected by powerful magicks before the kobolds arrived and broke the seals.
The nest here is made from the shredded remains of the books. The chest can be opened with the key Irontooth keeps in his pouch or a Thievery check (DC 20). It contains 420 gp and a suit of +1 dwarven chain mail (see module). AREA 5 - THE WYRMPRIEST'S CHAMBER: This chamber was once a shrine dedicated to the goddess Tiamat (who is held sacred by the Clan of the Withered Arm). Once Irontooth took control of the clan, he forced a conversion of the shrine to the worship of Orcus.
The golden skull is worth 150 gp. A character making a successful Perception check (DC 15) will notice the following symbol carved into the wall behind the altar:
A Religion check (DC 15) will recognize this as a holy symbol of Tiamat. Characters taking a closer look at the symbol can make an additional Perception check (DC 15) to realize that the hole in the center of the symbol is actually a depressed button. Pushing the button causes a section of the wall to slide back, revealing a stone idol:
This holy idol is dedicated to Tiamat. Touching the idol triggers one of the omen visions (which will be described in a later essay). AREA 6 - THE DESECRATED TOMB: The stairs leading down to area 6 are uneven and slick with condensation. Characters must make a Balance check (DC 10) while moving down the stairs.
This area was once a tomb for the Vassals of the Verdant Lord. When the kobolds moved in, they desecrated the burial chamber. Their thoughtless and spiteful destruction created a vengeful druidic spirit which still lurks here. The kobolds avoid this entire area now. If a PC moves more than 15 feet into the room, the druidic spirit will manifest itself:
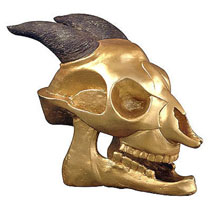
PCs can attempt a skill challenge (4/2, with Diplomacy and Nature as primary skills) to convince the spirit that they are friendly. Knowing of the Vassals of the Verdant Lord counts as an automatic success in this skill challenge. Swearing fealty or otherwise pledging themselves to the druidic cause also counts as an automatic success. If the PCs fail, the light in the center of the chamber grows and the spirit begins lashing out with lightning bolts (Range 20, 1d6+2 damage). There is no way for the PCs to exorcise this spirit at this time. (Alternatively, if you have the 4th Edition MM, use the stats for a phantom warrior but add the lightning bolt attack. The roots will move to defend the spirit from attacks, granting it -- but not its targets -- cover.) If the PCs succeed, the spirit can give them the history of the kobold lair. In addition, the druids have found a greater connection to the spirit of the land through their death. They are aware of Kalarel's ritual, which they describe as "a gaping wound in the natural world". They are also aware that there is a powerful artifact at the dragon burial site which and can tell the PCs where to find it. The artifact is "resonating" with Kalarel's ritual and they know that he seeks it. TREASURE: The dragonshields and Irontooth each wear necklaces from which dangle dragon figurines carved of obsidian. On the bottom of the figure is etched the outline of a skull with ram's horns. Anyone who succeeds on a Religion check (DC 15) recognizes the etching as an abstract representation of the demon lord of the undead, Orcus. PCs can sell the necklaces for 40 gp each in Winterhaven. The rest of the kobolds, in addition to their meager equipment, have 7 gp in loose coin on them.
WHERE ARE ALL THE WOMEN? The Clan of the Withered Arm lives in what is known as a bassabal by the kobolds: The nest-mates of the clan live more than a hundred miles to the south in the clan's "maternal nests". Once per year, during the bassasurnal ("the season of egg-laying"), a large portion of the clan will make the journey south to meet with their nest-mates. The kobold young are raised in the maternal nests until their year of ascension, at which time the clan males will test them through the rites of manhood and then bring them back to the hunter nests.
WHAT HAPPENED TO ISSITIK? Issitik was taken to Area 2 of the keep and thrown in a cell. He's being held as a hostage to help keep the kobolds in line. If Issitik is freed, he will attempt to enlist the aid of the PCs in freeing his people. If he is brought to the kobold lair, all of the kobolds -- except for the two dragonshields -- will turn against Irontooth. Issitik will thank the PCs and gift them with the fire glowgem from the throne and the +1 dwarven chain mail from the chest. He will also tell them this: "While I lay in pain and captivity, I saw great visions of darkness. The thing beyond the veil brings death with its grip, and Kalarel hopes to open all these lands to its grasp. He must be stopped before his power grows too great." If Issitik discovers that his clan has been wiped out (or largely wiped out), he will lay a curse upon the valley and the village of Winterhaven. If he knows the PCs were responsible, he will give them a cold epithet in kobold and say: "May the grasp of the veil-thing find your soul!" Later, if the PCs investigate the kobold lair again, they will find a message written in blood on the wall behind the throne. The runes require an Arcana check (DC 15) to decipher and read: "THIS VALLEY SHALL BE CURSED FOR THE BLOOD IT HAS SPILT" (The consequences of that curse, if any, could, of course, lead to other adventures.) Either way, Issitik seeks to lead as many of his followers as possible back to the maternal nests. He has become convinced that the lands of this valley have become cursed for his people. However, if the PCs helped the kobolds, two kobold slingers -- named Dassesek and Trigassas -- volunteer to join the PCs in fighting Kalarel. | | Link |
||||||||||||||||||||||||
|
June 7th, 2008
REMIXING KEEP ON THE SHADOWFELL If you own the 4th Edition Monster Manual, you can add the following encounter:
This is a kobold cansatak -- a "war party which hunts vengeance". They could be dispatched to kill the PCs by Kalarel, Irontooth, or even Issitek (if he finds out the PCs are responsible for wiping out the clan). Use this encounter when the PCs are resting or traveling. It's a good way to jack up the energy levels at the table if things are starting to lag. The cansatak could even attack them in the ruins of the keep if you feel that the PCs are getting too complacent in the sections they've already cleared out. TRIGGER: The kobold slyblade tracks the PCs, moving two hundred feet ahead of the rest of the cansatak. When the encounter is triggered, the PCs can make a Perception check (DC 23) to notice the slyblade watching them from 50 feet away. A few moments later, the slyblade slips away and heads back to the rest of the cansatak. (If the PCs attack, the slyblade will turn and run with harsh reptilian cries which are quickly answered by the rest of the cansatak.) If the PCs don't notice the slyblade, a few minutes later the entire cansatak attacks: The dragonshields and minions charge in and surround the PCs, engaging them in melee. Once the PCs are fully engaged, the slyblade follows (allowing it to use its sly dodge ability to maximum effectiveness). | | Link |
||||||||||||||||||||||||
|
June 9th, 2008
REMIXING KEEP ON THE SHADOWFELL PART 3: ARRIVING IN WINTERHAVEN SPOILER WARNING! The following thoughts contain minor spoilers for Keep on the Shadowfell. If you don't want to be spoiled, don't read it. And if you're in my gaming group then you definitely shouldn't be reading it.
STARTING THE ADVENTURE I'm not using the default adventure hooks for Keep on the Shadowfell because I feel they give away too much of the mystery before the adventure even starts. Basically, one of the ways in which I want to enrich this adventure is to give the PCs more freedom and more initiative. And the way to do that is to give them some mysteries to explore and some problem solving. The default adventure hooks, in general, short circuit this process by jumping them either blatantly or directly to the solutions. Instead I'm using the following set-up and hook for the adventure:
ARRIVING AT WINTERHAVEN After using the On the Road: Kobold Brigands ambush to jump-start the adventure, read the following:
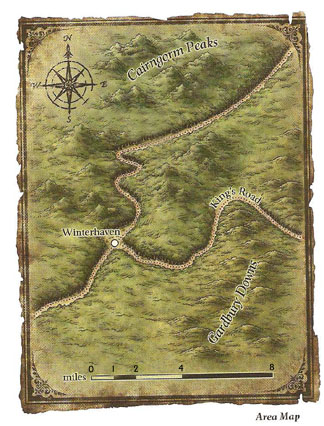
LOCAL GEOGRAPHY I have modified the map found in the adventure so that it can be used as a player handout without spoiling the adventure:
However, there is a problem with this map: According to the module, this village has a population of 977, mostly farmers living in the surrounding area. But where are the farms? FARMS: There are a couple dozens farms in the area immediately
around Winterhaven (primarily to the south and west of the city). However,
most of the local farmers are located about five miles southwest of the
city. TRADE: There is a large city (Fallcrest) about a hundred miles distant along the King's Road to the east and a smaller city (Wintermist) on the banks of Lake Wintermist on the road north out of Winterhaven. As a result, the village is something of a natural nexus for trade -- the farms from the south; the fishermen from the north; and the craftsmen from Fallcrest all naturally at the crossroads in Winterhaven. | | Link |
||||||||||||||||||||||||
|
June 10th, 2008
REMIXING KEEP ON THE SHADOWFELL PART 4: ON THE STREETS OF WINTERHAVEN SPOILER WARNING! The following thoughts contain minor spoilers for Keep on the Shadowfell. If you don't want to be spoiled, don't read it. And if you're in my gaming group then you definitely shouldn't be reading it.
DESIGN GOALS In Keep on the Shadowfell, the information on NPCs and information in Winterhaven is primarily organized in a question-and-answer format that will help new DMs make sure the PCs get all the information they're supposed to. As an experienced DM, however, I found the format far too cumbersome for my purposes. In my experience, I like to have two sets of tools available during these types of information-gathering scenarios: Guidelines for handling how much and what type of information to give out with Streetwise checks and detailed roleplaying notes for important or notable characters. I'm going to start, today, with the Streetwise checks. I've also made a couple of more general changes to the general structure of the adventure. As written, the PCs are generally handed clear-cut quests with simplistic goals: "Kobolds are bad. Go to their lair and kill them." I've generally tried to make things a little less clear-cut. For example, Lord Padraig wants the kobold threat eliminated... but he doesn't actually know where the kobold lair is. (So the PCs will have to figure that out.) Similarly, I've decided to make Valthrun the Seer less of a know-it-all. I'm actually quite annoyed by this character. "I have valuable information that would help solve this problem... but I won't tell anybody until the PCs have hit level 2." So instead of knowing everything, he knows a few things, can research a bit more, and can point the PCs in the direction of somebody who knows even more (Douven Stahl, who's currently being held prisoner at the dragon burial site).
WINTERHAVEN - STREETWISE CHECKS Any information coming from a specific character can be gained by simply asking the character about the topic in question. (I consider Gather Information/Streetwise checks to be a mechanic which either: (a) Lets a character find out the general "news on the street"; or (b) Get them in touch with a specific character who knows the information. In other words, I tend to use Streetwise checks to introduce the PCs to new characters and jumpstart a relationship with them.) STREETWISE - GENERAL INQUIRES
STREETWISE - KOBOLDS
STREETWISE - KEEP ON THE SHADOWFELL
FOLLOWING UP WITH VALTHRUN "The Keep was built as an
outpost of the Empire of Nerath, most likely to guard against the giant
tribes living in the northern reaches of the Stonemarch. Many such outpost
survived the fall of the empire, but not the Keep: Only two short decades
after the empire withdrew its influence from this part of the world, the
commander of the garrison – a man by the name of Sir Keegan – began to
systematically slaughter every resident of the keep, starting with his own
wife and daughter. "Some versions of the tale say that Sir Keegan succeeded – that
everyone in the keep was slaughtered. Many such tales claim that this was
a sacrifice to a dark god, and that Sir Keegan now lives in a sickly
paradise within another world – a reward for his bloody gift of tribute. But since there is, in fact, a story to be told, I suspect the
other version of the tale is probably true: Sir Keegan was too skilled for
any single soldier to defeat, but eventually the remaining garrison
rallied an organized defense. Although many brave soldiers died, Sir
Keegan was slain before his dark work could be completed. Rumors persist of great treasures buried beneath the keep, yet there are few tales of anyone daring to explore the ruins. A popular tale in the area was that old Sir Keegan’s ghost still roamed the corridors beneath the keep, wailing his grief and rage. But even this tale has faded with time, and the story of the wailing ghost is used to frighten children. Although the keep is still considered bad luck by most people in these parts, it has largely been forgotten." OTHER STREETWISE CHECKS LOOKING FOR SEER (DC 10) -- Valthrun the Prescient lives in the tower near the center of town. ORCUS (DC 15) -- Valthrun: "Orcus is the Demon Prince of the Undead. He is known as one of the most powerful demons in the Abyss -- powerful enough, in fact, that he has threatened the gods themselves. He is even known in some texts as the Godslayer. He commands legions of followers, living and dead, and cults dedicated to him are terrifyingly widespread throughout the world. If you're in search of a true expert, however, you should seek out Douven Stahl. He's visiting Winterhaven from Fallcrest, and he has gone to excavate a crater just south of the city which he believes to be a burial site of a dragon." TRAITOR (DC 20) -- (This check is only effective after the graveyard interlude.) Bairwin Wildarson saw Ninaran leaving the village about an hour before the first undead attack. The guards remember that, too, and say that Ninaran told them she was going hunting. But Perrien saw her slipping back into the village shortly after the first undead attack. DRAGON BURIAL SITE (DC 15): There's a large crater to the southeast of the city. A scholar from Fallcrest by the name of Douven Stahl passed through the village about a month ago. He mentioned something about thinking that the crater might be a dragon burial site. He left the village two weeks ago and he hasn't been heard from since. | | Link |
||||||||||||||||||||||||
|
June 11th, 2008
I'M VOTING REPUBLICAN Screw it. I'm voting Republican. I'm voting Republican because I don't think the President of the United States should be able to use a computer:
I'm voting Republican because I, like Jim Inhofe (Republican), believe that Iraq is an African nation:
I'm voting Republican because I'm part of the 90% of Americans who will end up paying more taxes under President McCain, and I love paying taxes. ... It's like Jon Stewart once said: "It's not so much that you can't make this stuff up. It's that you wish that you had to." | | Link |
||||||||||||||||||||||||
|
JUNE 2008: |
||||||||||||||||||||||||
|
RETURN TO THE ALEXANDRIAN - SUBSCRIBE
|
||||||||||||||||||||||||